“What are they?” asked my son en passant. “Scallion pancakes; they’re a kind of fry bread.” “Can’t go wrong with fry bread!” he replied, and snatched one to eat before mowing.
Yes, Spring is here (again), and we’ve gone through our usual winter-spring-winter-summer-winter-spring nonsense. The daffodils are blooming, the grass needs mowing, and the scallions are up. Scallions are the same thing as green onions, meaning ordinary yellow or white onions harvested when young. I have some volunteer onions in the former vegetable patch (soon to be lawn again), and because they grew from rogue seeds last year, and as onions are biennials, this year they will in turn go to seed if not harvested before that point. I woke up the other morning thinking, “Boy, some Scallion Pancakes sound really good!” A dim sum from Shanghai, these fry breads are some of the simplest of the tea-house treats to make. If you don’t have any scallions on hand (or found them withered away in the back of the crisper drawer), you can use Chinese chives (AKA garlic chives or Chinese leeks).
PREPARING THE DOUGH AND SCALLIONS
In a large mixing bowl, blend together:
- 1 1/2 cups (150 g) all-purpose flour
- 1/2 cup (125 mL) hot water — plus a tablespoon more, if needed
Once the dough is rough and clumpy, liberally sprinkle flour on a clean counter, and knead the dough for a few minutes until it’s smooth and workable. Wrap the dough in a damp cloth or plastic bag and set it aside to rest for 30 minutes (set a timer). TIP: Set the mixing bowl in the sink, and fill with hot sudsy water to soak off the sticky bits. Then I go out to harvest my scallions. When pulling up scallions, knock off the extra soil from the roots, and also strip off the outermost leaf. When onions grow, each onion layer is formed from a leaf; stripping off the outermost leaf removes the thin, dried, dirty layer. In the kitchen, rinse off the scallions (including any soil hiding in-between the leaves), and trim off the roots and brown leaf tips. This recipe only calls for the green parts, so you can set aside the white stalks for a stir-fry or omelette. In a 2-cup (1/2 L) measure, blend together:
- 1 1/2 cups (325 mL) scallions, chopped small
- 1 teaspoon (5 g) sugar
- 1 teaspoon (5 g) salt
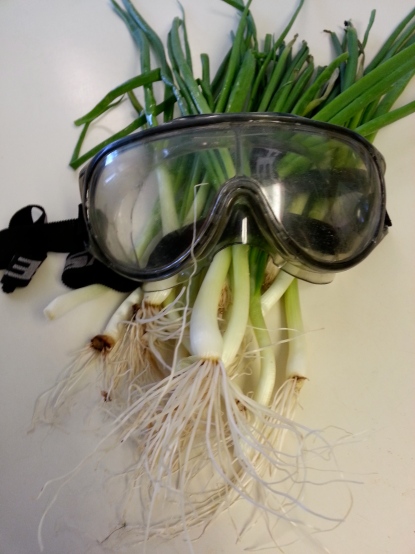
TIP: I wear safety / laboratory goggles when chopping onions, as they keep the fumes from my eyes. Yes, it looks doofy, but it’s the best method I have yet to find to prevent the watering-eyes problem.
The scallions need to macerate in the sugar and salt to get soft and tasty, so meanwhile we’re going to do some cleaning up. Remove any clumps of dough from the counter; I use the edge of my square-bladed metal spatula / turner, as I’m too cheap to spend money on an official dough scraper when something else works just fine. TIP: To remove gummy dough bits from the mixing bowl, pour out the suds and use a rubber spatula to scrape off the lumps. Wash the mixing bowl and rubber spatula, plus wash and dry your knife and cutting board, as you’ll need the latter again.
ASSEMBLING THE PANCAKES
Flour the counter, and cut the dough into two even lumps. Take one lump, and roll / squeeze it into a log 12 1/2″ (35 cm) long. Cut the log into five, 2 1/2″ (6.5 cm) long sections. Move four sections aside, and roll out the remaining piece very thin, into a rectangle 10″ x 4″ (25 x 10 cm).
(Yes, these conversions aren’t exact, and that’s okay as we’re going to be further mashing up the dough anyway.)
TIP: It’s hard to use a rolling pin to stretch the dough by just rolling it. So after the initial bout of rolling the dough flat, I use the rolling pin to anchor one end and gently pull, then without lifting the rolling pin, lay down the stretched dough and roll the pin over the dough to secure the stretching and flatten it more. Then I roll the other direction to broaden the piece.

Hold down one end of the dough with a rolling pin and gently pull on the other end to stretch it out.
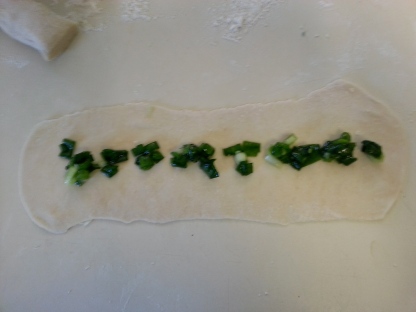
Now it’s time to fill that piece of dough! Take a tablespoon of scallions and distribute them along the center of the strip, but stop half an inch (1 cm) before each end. (Resist the urge to “supersize” your load; you’ll find out why.)
Fold over each of the short ends, and then fold over the top to cover the scallions, and the bottom to cover the top. I’ve never seen any recipe source mention folding in the short ends, but I have found from making burritos and such that tucking in the short end first helps prevent the filling from falling out. Take one end and fold the whole thing over lengthwise (doubled).

Filled dough showing one short end folded in first, and the bottom and top lengths folded over each other.
Lift from the counter and gently smuush it along its length to make it thinner and longer. Take the end with the original ends, and fold it over a bit.

An inch of the open end of the doubled, filled dough has been folded over to begin the coiling process.
Then coil up the roll, tucking the outside end between adjoining parts of the ring.
TIP: Don’t even think of trying to use a rolling pin to flatten the coil into a pancake; even using your palm to flatten it onto the countertop doesn’t work well. Instead, dust it well with flour, and use your fingers to palpate the dough, pressing it as thin as possible, all over.
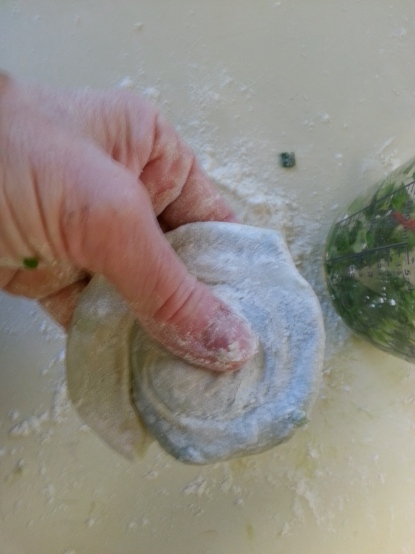
Pressing the coil thin between fingers to flatten it. In real life, I generally use two hands; here I was taking the picture with the other hand.
Note that some scallions wil pop out of the dough and create a juicy mess here and there. That always happens. Tuck them in, or just use them in the next pancake. Don’t worry your early pancakes aren’t terribly round; they will still taste good.
Repeat the rolling, filling, coiling and flattening process with the other pancakes.
You might ask, “Wouldn’t it just be easier to flatten and fill one of those two big lumps of dough, and then cut it into five pieces, instead of doing each piece separately?” Being an efficient sort, I wondered that myself, and tested my dough with both methods. The fill-then-cut pancakes ended up much messier, with scallions popping out everywhere. You can see the results here, with the fill-then-cut on the left, and the make-five-individually on the right:
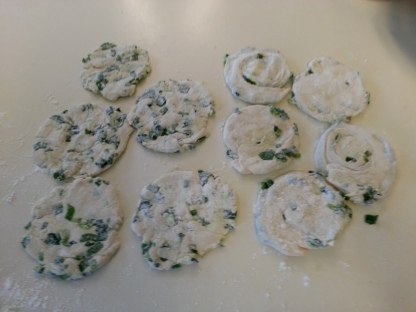
Comparing two methods: five of the the messy fill-then-cut pancakes on the left, and five of the tidy make-five-individually on the right.
TIP: To easily remove the dough and scallion gunk off your hands, use warm running water and a rubber spatula to scrape off the dough; be sure any dough bits aren’t left stuck on the sink where they might harden.
Likewise, scrape off your counter, and put your utensils to soak in warm, soapy water. The washing up will be easy to do by the time you’ve cooked and eaten your scallion pancakes.
LAST STEPS: COOK AND ENJOY!
Get a large iron or non-stick skillet and heat up a thin layer of oil for frying your pancakes. (On my electric stove, the ideal setting is somewhere between Medium and Medium-hot, but stoves vary.) Do not crowd the pan with too many. The pancakes are ready to turn over for frying on the second side when lightly browned, and the dough looks mostly white instead of translucent. Once fried on both sides, remove to blotting paper.
TIP: I drape a couple of paper napkins over the pages of an old phone book; the napkins keep the ink off, and the phone book pages provide plenty of blotting ability. Once the cooking is over, I rip those pages from the book and toss them.
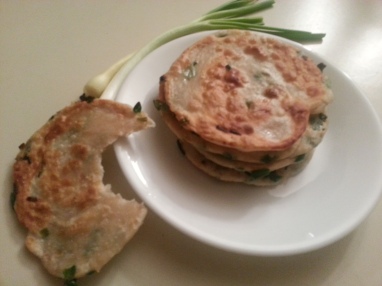
No sauce is needed for this dim sum; just let the Scallion Pancakes cool enough to eat!



You must be logged in to post a comment.